OAI F1AP PQ-IPSec
Author: Shubham Kumar & Aditya Koranga
Published: December 16, 2025
This repository contains instructions and configuration files for establishing a Post-Quantum (PQ) secure IPsec tunnel using StrongSwan between an OpenAirInterface (OAI) Central Unit (CU) and Distributed Unit (DU) over the F1AP interface (Split Option 2).
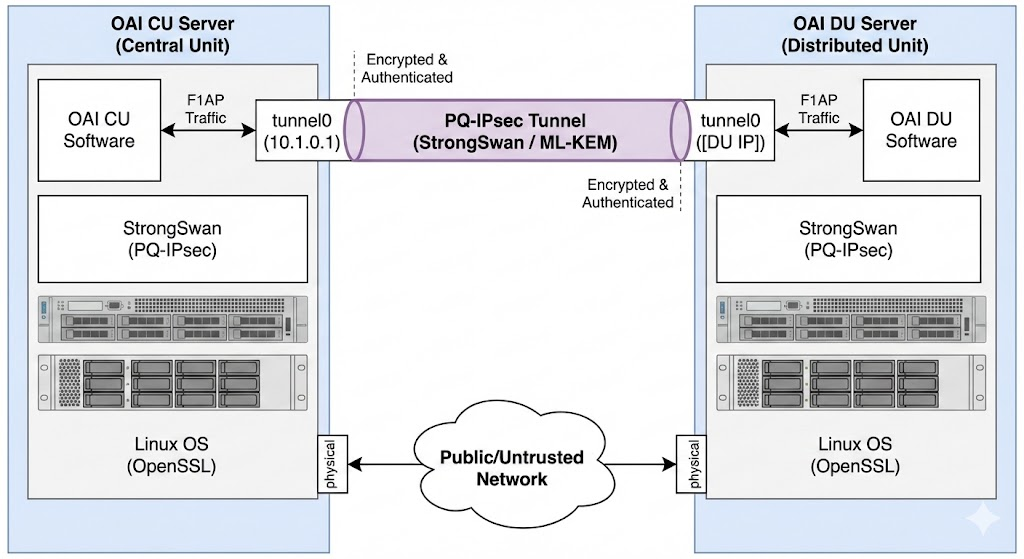
Note: This documentation is a replica of the README available at the github/ngkore/OAI-F1AP-PQ-IPSec. Please refer to the original repository for the most up-to-date information.
Related Documentation
Core Network: Refer to ngkore/OAI-CN5G for OAI Core Network deployment (Option A).
RAN Configuration: Refer to ngkore/OAI_F1AP_Split for building and configuring the gNB and nrUE in disaggregated mode on different servers.
Overview
This solution implements an IPsec VPN in tunnel mode using StrongSwan 6.0.2 linked against OpenSSL 3.6.0 on Ubuntu 22.04. It supports configurable authentication via X.509 certificates or Pre-Shared Keys (PSK).
The implementation supports two specific security modes:
Classical Mode:
Authentication: RSA-4096 certificates.
Key Exchange: Standard RSA key exchange groups.
Post-Quantum Mode:
Authentication: RSA-4096 certificates (for identity) or PSK.
Key Exchange: ML-KEM (Module-Lattice-Based Key-Encapsulation Mechanism) groups.
Note: StrongSwan v6.0.2 does not currently support Post-Quantum certificates (e.g., ML-DSA). Support is currently under development in the StrongSwan experimental branches.
Prerequisites
Operating System: Ubuntu 22.04 LTS.
Privileges: Root or sudo access is required for all commands.
Hardware: Two separate physical or virtual machines (one acting as the CU/Server, one as the DU/Client).
System Preparation
Perform the following steps on both the Server (CU) and Client (DU) machines.
1. Install Build Dependencies
Update the package list and install the necessary development tools and libraries.
sudo apt-get update
sudo apt-get install -y \
    build-essential git wget curl autoconf automake libtool pkg-config \
    gettext bison flex gperf libgmp-dev libcurl4-openssl-dev \
    libsystemd-dev libpam0g-dev libldap2-dev libsqlite3-dev \
    libmysqlclient-dev libpq-dev libxml2-dev libjson-c-dev libcap-dev \
    libiptc-dev libnm-dev libxtables-dev libip4tc-dev libip6tc-dev \
    libnetfilter-conntrack-dev iproute2 iputils-ping net-tools tcpdump \
    python3 vim checkinstall zlib1g-dev perl-modules-5.34 perl-doc
2. Build and Install OpenSSL 3.6.x
Download and compile the specific OpenSSL version required for PQ support.
cd /tmp
wget https://github.com/openssl/openssl/releases/download/openssl-3.6.0/openssl-3.6.0.tar.gz
tar -xzf openssl-3.6.0.tar.gz
cd openssl-3.6.0

./config --prefix=/usr/local --openssldir=/usr/local/ssl
make -j$(nproc)
sudo make install
sudo ldconfig
Verify the installation using the local library path:
LD_LIBRARY_PATH=/usr/local/lib64 openssl version
Warning: Do not modify the global system configuration (e.g.,
/etc/ld.so.conf.d/) to force the system to use OpenSSL 3.6.0 globally. This will break system tools such as SSH and APT that rely on the default system OpenSSL version.
3. Build and Install StrongSwan 6.0.x
Compile StrongSwan with specific flags enabled for systemd, OpenSSL, and Machine Learning (ML) algorithm support.
cd /tmp
wget --no-check-certificate https://download.strongswan.org/strongswan-6.0.2.tar.bz2
tar xjf strongswan-6.0.2.tar.bz2
cd strongswan-6.0.2

PKG_CONFIG_PATH="/usr/local/lib64/pkgconfig:/usr/local/lib/pkgconfig" \
CPPFLAGS="-I/usr/local/include" \
LDFLAGS="-L/usr/local/lib64 -L/usr/local/lib -Wl,-rpath,/usr/local/lib64 -Wl,-rpath,/usr/local/lib" \
./configure \
    --prefix=/usr \
    --sysconfdir=/etc \
    --localstatedir=/var \
    --with-systemdsystemunitdir=/lib/systemd/system \
    --disable-defaults \
    --enable-charon --enable-systemd --enable-vici --enable-swanctl \
    --enable-ikev2 --enable-openssl --enable-ml --enable-nonce \
    --enable-random --enable-pem --enable-x509 --enable-pkcs1 \
    --enable-pkcs8 --enable-pki --enable-pubkey --enable-socket-default \
    --enable-kernel-netlink --enable-updown --enable-resolve --enable-silent-rules

make -j$(nproc)
sudo make install
sudo ldconfig
4. Create Configuration Directories
Create the necessary directory structure for swanctl.
sudo mkdir -p /etc/swanctl/{conf.d,x509ca,x509,private,rsa,ecdsa,pkcs8,pkcs12,pubkey}
sudo chmod 700 /etc/swanctl/{private,rsa,ecdsa,pkcs8,pkcs12}
sudo chown -R root:root /etc/swanctl
5. Enable IP Forwarding
Configure the kernel to allow IP forwarding and disable redirects.
sudo sysctl -w net.ipv4.ip_forward=1
sudo sysctl -w net.ipv4.conf.all.accept_redirects=0
sudo sysctl -w net.ipv4.conf.all.send_redirects=0

# Persist settings
echo 'net.ipv4.ip_forward = 1' | sudo tee -a /etc/sysctl.conf
sudo sysctl -p
6. PKI Generation
This repository includes a script to generate the required Public Key Infrastructure (PKI). Clone it on both machines but run this on the server only, and then distribute the resulting files (<IPSEC_MODE>/pki/) to client.
git clone https://github.com/ngkore/OAI-F1AP-PQ-IPSec
cd OAI-F1AP-PQ-IPSec/
chmod +x generate-pki.sh
./generate-pki.sh <IPSEC_MODE>
To share the generated files with the client, you can use scp or any secure file transfer method.
scp -r <IPSEC_MODE>/pki/ <user>@<client_ip>:/home/<user>/OAI-F1AP-PQ-IPSec/<IPSEC_MODE>/
Note:
IPSEC_MODE: Set toclassicalorpq-support.
AUTH_MODE: Set tocertsfor certificate-based authentication orpskfor pre-shared key authentication.
Server Configuration (CU)
1. Install Certificates (Certificate Mode Only)
Transfer the generated files to the server’s swanctl directories.
sudo cp <IPSEC_MODE>/pki/cacerts/ca-cert.pem /etc/swanctl/x509ca/
sudo cp <IPSEC_MODE>/pki/certs/server-cert.pem /etc/swanctl/x509/
sudo cp <IPSEC_MODE>/pki/private/server-key.pem /etc/swanctl/private/
sudo cp <IPSEC_MODE>/pki/certs/client-cert.pem /etc/swanctl/x509/
sudo cp <IPSEC_MODE>/pki/private/client-key.pem /etc/swanctl/private/
2. Configure Swanctl
Edit the server.conf file to match your physical network addresses (local_addrs and remote_addrs), then install it.
sudo cp <IPSEC_MODE>/conf/<AUTH_MODE>/server.conf /etc/swanctl/swanctl.conf
3. Network Interface Setup
Create a dummy interface to serve as the tunnel endpoint.
sudo ip link add name tunnel0 type dummy
sudo ip addr add 10.1.0.1/32 dev tunnel0
sudo ip link set tunnel0 up
4. Start Service
sudo systemctl enable strongswan
sudo systemctl start strongswan
sudo swanctl --load-all
Client Configuration (DU)
1. Install Certificates (Certificate Mode Only)
sudo cp <IPSEC_MODE>/pki/cacerts/ca-cert.pem /etc/swanctl/x509ca/
sudo cp <IPSEC_MODE>/pki/certs/server-cert.pem /etc/swanctl/x509/
sudo cp <IPSEC_MODE>/pki/private/server-key.pem /etc/swanctl/private/
sudo cp <IPSEC_MODE>/pki/certs/client-cert.pem /etc/swanctl/x509/
sudo cp <IPSEC_MODE>/pki/private/client-key.pem /etc/swanctl/private/
2. Configure Swanctl
Edit the client.conf file to match your physical network addresses (local_addrs and remote_addrs), then install it.
sudo cp <IPSEC_MODE>/conf/<AUTH_MODE>/client.conf /etc/swanctl/swanctl.conf
3. Start Service
sudo systemctl enable strongswan
sudo systemctl start strongswan
sudo swanctl --load-all
Note: The tunnel should establish automatically upon loading the configuration. If it does not, force initiation with:
sudo swanctl --initiate --child tunnel-to-corp
Verification and OAI Integration
Verify IPsec Status
On both nodes, check the Security Associations (SAs):
sudo swanctl --list-sas
Expected Output: Status should indicate ESTABLISHED and INSTALLED.
Connectivity Test
From the Client (DU), ping the Server’s (CU) tunnel IP:
ping -c 3 10.1.0.1
OAI Configuration Update
To utilize the encrypted tunnel, you must update the OAI configuration files:
CU Configuration: Bind the F1 interface to
10.1.0.1(thetunnel0interface IP).DU Configuration: Configure the remote CU address as
10.1.0.1.
This ensures F1AP traffic flows through the tunnel0 interface, where it will be intercepted and encrypted by the StrongSwan policies.
Tutorial Video
Implementing PQ-IPSec between OpenAirInterface (OAI) CU-DU using StrongSwan and OpenSSL